
The very first thing any professional is taught (and subsequently judged on) is knife work. This means, how precisely, consistently and how quickly you can execute a particular cut or dice. In culinary school, it’s course #1, and for those attempting to learn on the job, it’s the first (and only) thing you’ll be allowed to do with food – until you can prove your proficiency in it. If you can’t julienne a half an onion in under five seconds, pick up that knife and keep trying until you can. If the carrots you were asked to small-dice (1/4” cubes) look like they came out of a slap chop, throw them in the stock bin, and have another crack.
Most home cooks don’t care about how fast they can do something, or whether or not a vegetable is cut uniformly – and they don’t have to. But whether in the home kitchen or in a professional one, what is unavoidable is the link between proper knife technique and efficient results. This happens to be where most home cooks fall short.
What to do with your hands
Anyone who’s been cooking professionally for longer than six months can draw all the conclusions they’ll need about someone’s knife technique before the blade hits the block. The positioning of both a cook’s knife-hand and off-hand are clearly indicative of — and critical to — proper chopping technique.
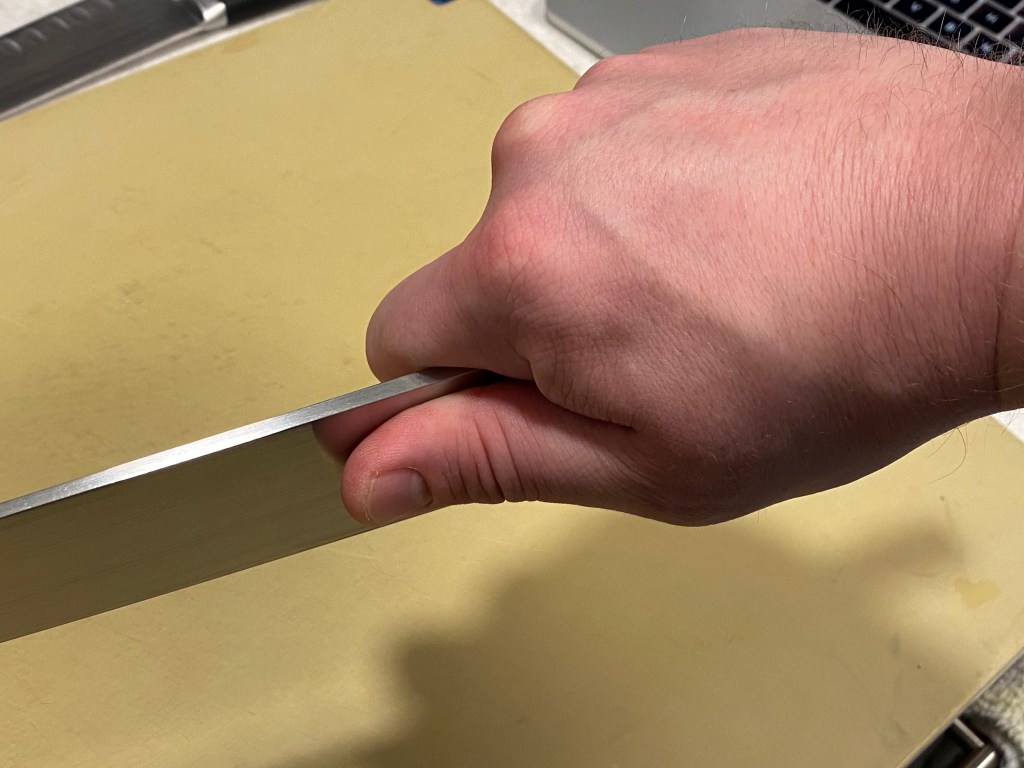
When it comes to proper grip of the knife, you’re (probably not so intuitively) not holding the handle — or at least not as a handle. You actually should be holding the hilt (the part where the blade ends and the handle begins). The top of the blade should be held between the thumb, and the lowest knuckle of your index finger. Doing this gives you more control, as well as better leverage, leading to easier cutting. I personally choke up on my knife to the point where the hilt is pushed up against the tip of my ring finger.
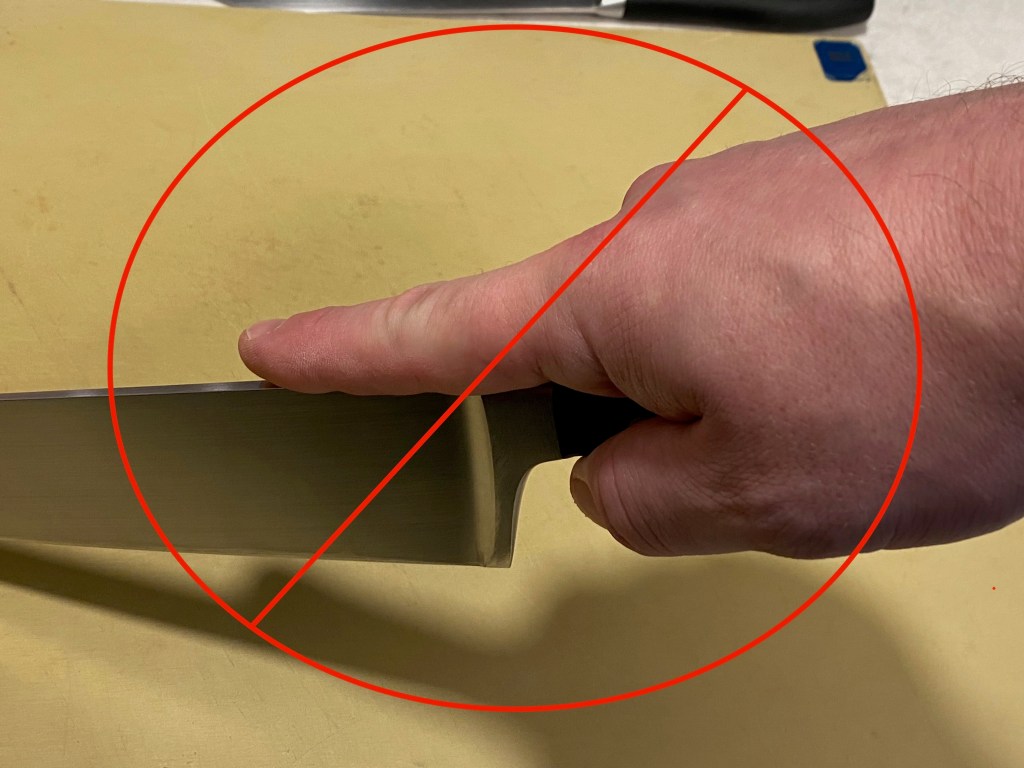
Many home cooks seem to want to hold a knife with fingers back, and the index finger laid on top of the spine of the knife. This is very incorrect and despite how natural it might feel, should be avoided.


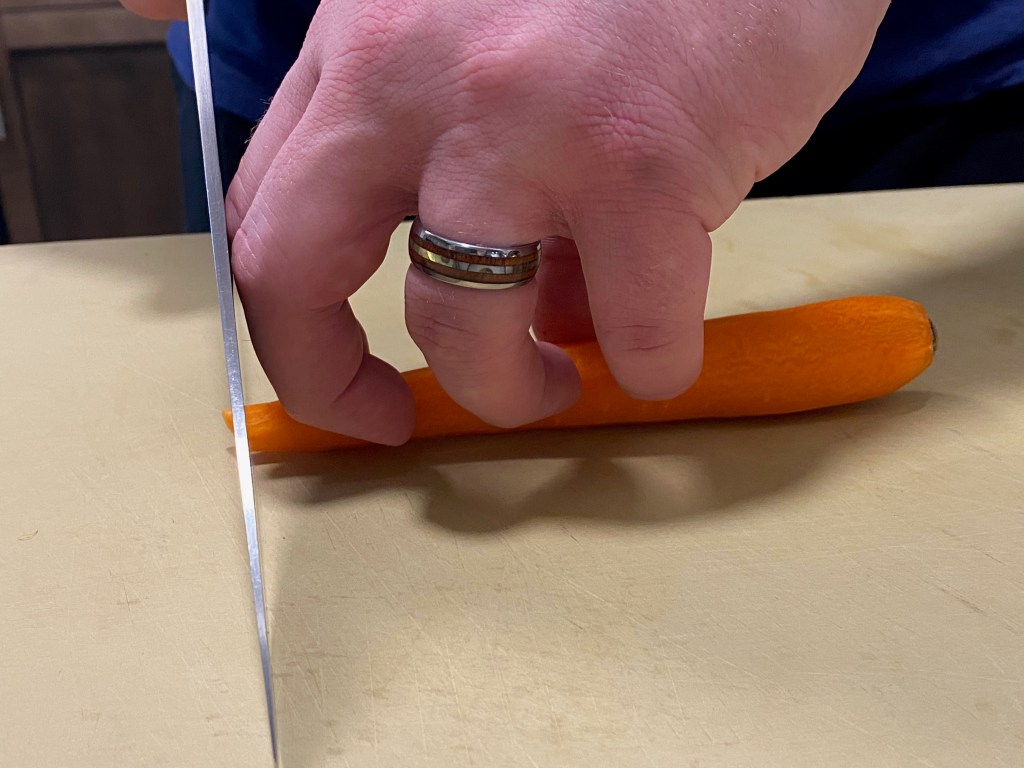
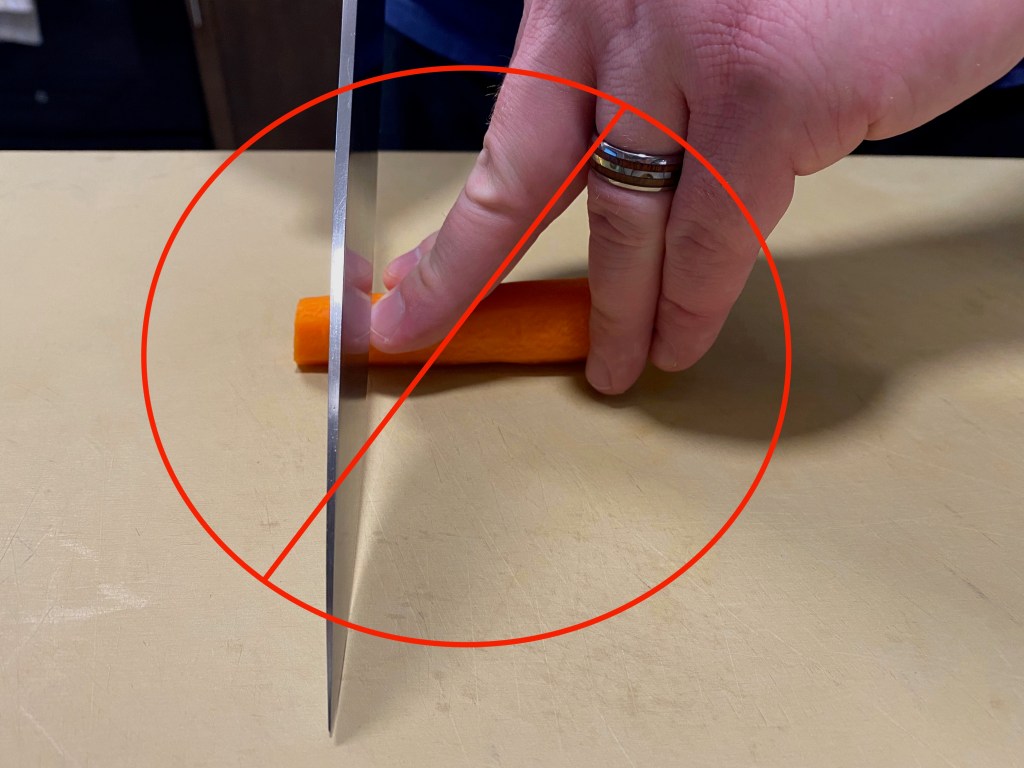
But seriously, the off-hand should be in a claw-like formation, with the fingertips ALWAYS behind the knuckles, using the fingertips and finger nails to keep an object in place, as opposed to the fingers’ pads. It is commonly intuitive for humans to hold things with the pads of their fingers, but in this case, your intuition should tell you that you don’t want to chop your finger off! If you do this correctly, you should also (in most cases) be sliding the face of the knife along your knuckles, and effectively using the knuckles of your off-hand to steer and guide the knife. This is how chefs can comfortably and quickly chop things without even looking at their board: if my knuckles are touching the knife face, then I know they aren’t coming in contact with the edge of the blade, and the edge is the only dangerous part of a knife.
The Four Types of Knife Movements
Now that you’re holding your knife correctly, there are four safe and acceptable movements a knife can take when cutting produce (butchery – that’s a whole different animal… *again, pause for laughter*). For today’s purposes, I’ll refer to them as: the chop, the French slice, the drag, and the Japanese slice. These aren’t universal phrases, but I think they suffice.
The Chop
The chop is when the heel of the knife barely comes off the board. Instead, the tip of the knife rapidly goes up and down, with the mid-front portion of the blade responsible for the actual contact point of the cut. Things commonly chopped in such a way include onions, mushrooms and celery.
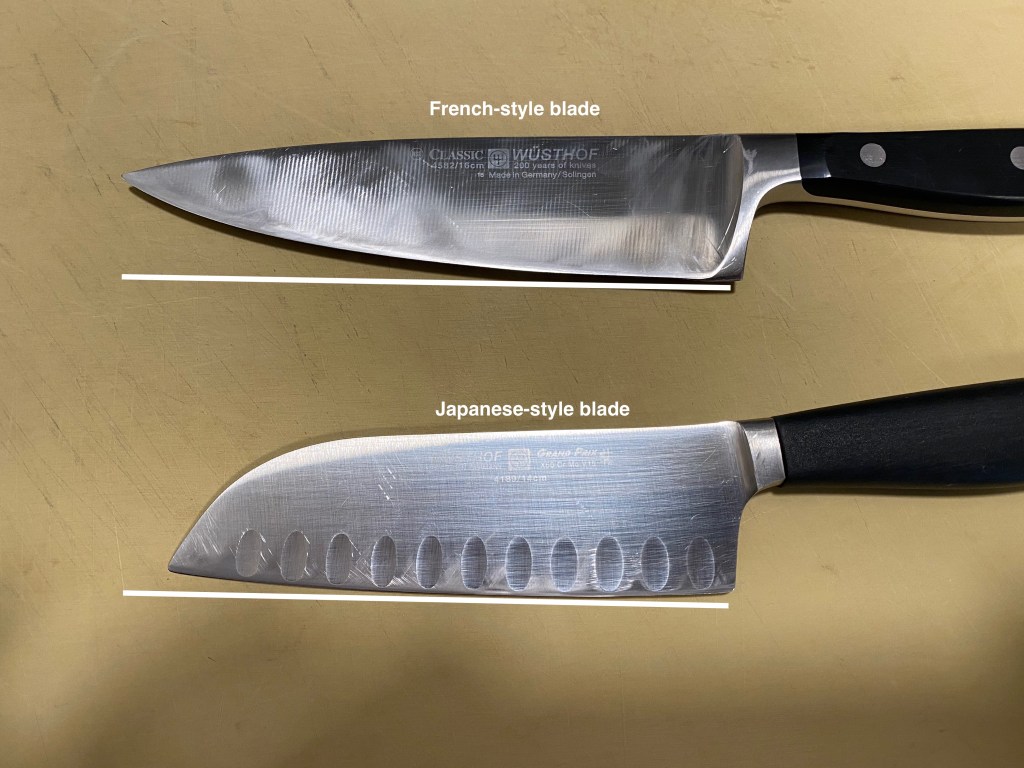
The French Slice
The French slice calls for a French-style knife. The most widely available style of knife in the US, the French-style blade profile is flat from the base to about the mid-point of the length of the blade, at which point it gradually starts a curve that flips up to the point (see image below). This allows for the French slice motion:
The nose of the knife never leaves the board, and the heel starts high enough above the board for what’s being cut to fit under about the half-way point of the blade length. Then, the hilt comes down, while the hand pushes the knife forward a bit, resulting in a rocking, sliding motion that is just as much up and down as it is back and forth. Note: many people will omit the back-and-forth motion in this movement, and still execute the cut (see video below). The reason this is possible is because of the curvature of the blade, and/or that of the knife’s path of motion from the top of the movement to the board. However, if you don’t understand the point of the to-and-fro element of the motion, slice a carrot without and then with that element, and notice the difference in how many orange splinters are produced.
The Drag
The drag is used to slice things like large pieces of meat or fish — or anything as long, or longer than the length of your knife — with a single, long motion. It involves the blade of a knife being placed tip-down on the board, at the top of an ingredient, at roughly a 20º angle with the board. Then, the blade is dragged toward you until you’ve sliced through the length of the ingredient in question. It’s essentially the French slice, but in reverse.
The Japanese Slice
Finally, the Japanese slice is meant for (you guessed it) a Japanese-style blade. The major distinction, is that unlike the French knife, on which the blade curves up to the nose, a Japanese-style edge is virtually flat, with only the slightest curve of the blade’s profile.
The Japanese slice simply keeps the straight blade parallel with the surface of the cutting board, sliding forward over the course of a motion, but without the downward wrist-motion of the French slice. Sometimes, the Japanese slice can start with the knife resting on top, or just over the product to be cut. This can be executed with a French knife, just as the French slice can be executed with a Japanese knife. The Japanese slice is useful for maximizing the sharpness of the blade, meaning when you want to cut something very cleanly, as you would a fine dice or brunoise.
The common thread between all these different types of techniques, is that in addition to the blade going down through the ingredient to the board, there is some element of back-and-forth movement, which is essential to a blade being able to do its job. A blade used with a movement directly perpendicular to the cutting surface is called an axe — or in a kitchen, a cleaver. And that tool will only wedge into or break the target – it will not slice. On that note…
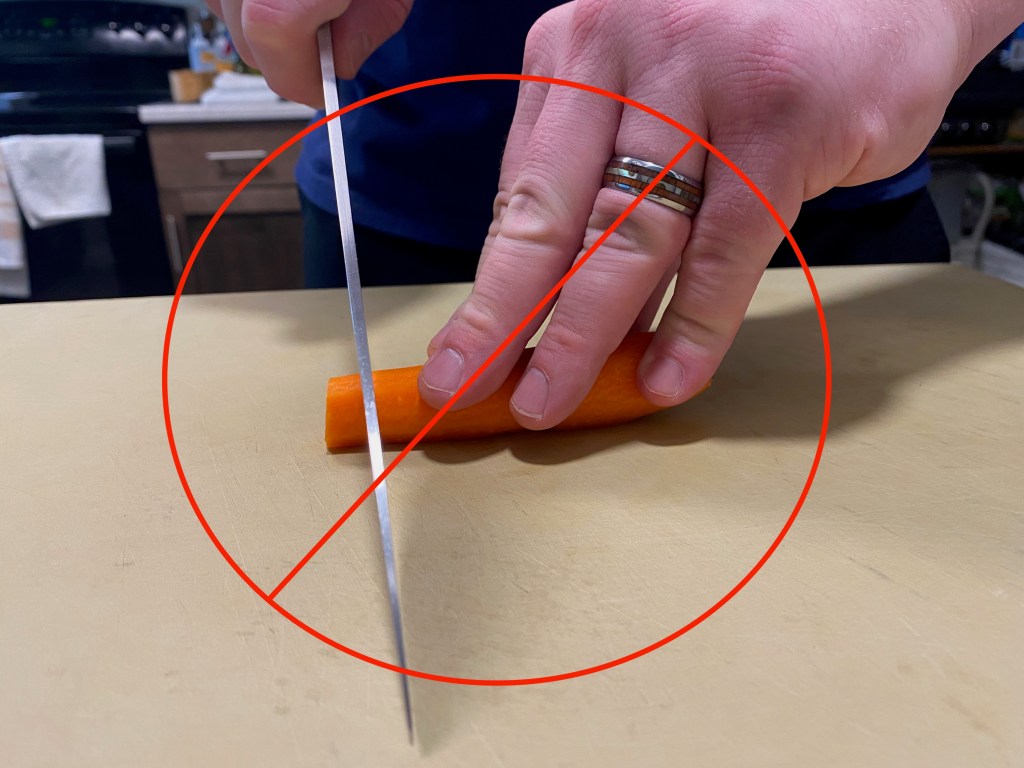
What Not To Do
It is very important to note three commonly attempted cutting motions that should be banned from every kitchen on the planet: the push, wherein the cook just tries to push the blade through the produce. Alluded to above with the axe, this is just working against the physics of slicing. To prove it to yourself, take your knife, and without any slicing motion, push it into your finger. You didn’t cut yourself, did you? That’s because a blade is only effective when a second dimension of movement is present.
The second banned motion is the tilt. This is when after a slice, with the edge of the blade still on (technically, slightly in) the board, a cook will then tilt the blade away from what has been cut. I think they do this to shirk the sliced piece off of the knife face, but it also slightly bends the edge of the blade each time, resulting in a damaged, dull knife.
The last banned motion (that will only be tolerated when using a serrated/bread knife) is the saw, wherein a cook will try to use rapid back-and-forth motions to saw through something.
All of these motions result in un-uniform cuts, bruised and often weeping fruits/vegetables, a damaged knife, and most importantly (and reliably), personal injury.
While proper technique is imperative when it comes to sufficient knife skills, it’s only half of the equation. Because even the most perfect technique will only get you so far without…A SHARP knife!
